Cell Body
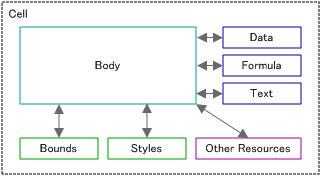
ReoGrid provides an interface known as ICellBody, which facilitates the creation of customized cells. A cell body can be embedded within a cell, where it adapts to the cell’s dimensions and gains access to certain cell resources.

Once a cell body is assigned to a cell, it seamlessly integrates with the cell, conforming to its size and interacting with the cell’s properties and methods.
Sample
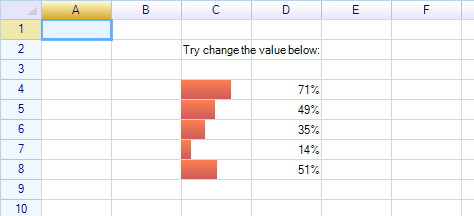
A sample cell body that displays a red progress bar inside cells.
::info More samples are available in the demo project. ::
Interface of Cell Body
To create a custom cell body in ReoGrid, it must either inherit from the CellBody class or implement the ICellBody interface. The CellBody class offers a variety of methods that can be overridden to customize the behavior and appearance of the cell.
Ensure the following namespaces are imported before using CellBody or ICellBody:
using unvell.ReoGrid.CellTypes;
using unvell.ReoGrid.Events;
using unvell.ReoGrid.Rendering;
The CellBody class serves as a base for custom cell bodies, encapsulating common functionality and properties required for cell customization.
public class CellBody : ICellBody
{
  public ReoGridCell Cell { get; set; }

  // Called when the cell body is associated with a cell.
  public virtual void OnSetup(ReoGridCell cell) { }

  public virtual Rectangle Bounds { get; set; }
  public virtual void OnBoundsChanged() { }

  public bool AutoCaptureMouse() { return true; }

  public virtual void OnMouseDown(CellMouseEventArgs e) { }
  public virtual void OnMouseMove(CellMouseEventArgs e) { }
  public virtual void OnMouseUp(CellMouseEventArgs e) { }
  public virtual void OnMouseEnter(CellMouseEventArgs e) { }
  public virtual void OnMouseLeave(CellMouseEventArgs e) { }
  public virtual void OnMouseWheel(CellMouseEventArgs e) { }

  public virtual void OnKeyDown(KeyCode e) { }
  public virtual void OnKeyUp(KeyCode e) { }

  public virtual void OnPaint(CellDrawingContext dc) { }

  public virtual bool OnStartEdit() { return true; }
  public virtual object OnEndEdit(object data) { return data; }
  public bool DisableWhenCellReadonly { get { return true; } }
  public virtual object OnPaste(object data) { return data; }
  public virtual void OnGotFocus() { }
  public virtual void OnLostFocus() { }

  public virtual object OnSetData(object data) { return data; }
}
This framework provides a structured approach to extending cell functionality in ReoGrid by leveraging the CellBody class or the ICellBody interface.
Create a cell body
Make a class inherit from CellBody and add an instance of it to a worksheet.
private class MyCellBody : CellBody
{
  public MyCellBody() {
    // ...
  }
}
Set cell body into a cell
To embed a custom cell body into a specific cell in ReoGrid, use either of the following methods. Both are functionally equivalent but offer different syntactic options based on your preference:
- Using the indexer on the sheet object:
sheet["C3"] = new MyCellBody();This method leverages the sheet object’s indexer, allowing you to directly assign a new instance of MyCellBody (or any other class derived from CellBody) to the cell at position C3.
- Setting the
Bodyproperty on the Cell object:
sheet.Cells["C3"].Body = new MyCellBody();This approach accesses the Cell object at position C3 through the sheet’s Cells property and sets its Body property to a new instance of MyCellBody.
Both methods replace any existing cell body in the specified cell with the new MyCellBody instance. Ensure that MyCellBody is a class that extends ReoGrid’s CellBody class, which allows you to customize cell behavior and appearance.
Remove cell body from cell
Set the Body property of the cell instance to null to remove the cell body:
sheet.Cells["C3"].Body = null;Owner Drawing
To implement custom drawing within a cell in ReoGrid, override the OnPaint method in your custom cell body class. This method provides a RGDrawingContext canvas for drawing graphics within the cell’s boundaries.
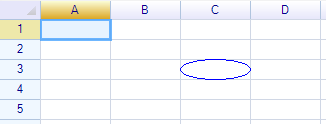
Example: Drawing an Ellipse
Below is an example of a custom CellBody class that draws an ellipse within the cell:
private class MyCellBody : CellBody
{
  public override void OnPaint(RGDrawingContext dc)
  {
    // Define the bounds for the ellipse. Here, it fills the entire cell.
    Rectangle ellipseBounds = new Rectangle(0, 0, base.Bounds.Width, base.Bounds.Height);

    // Draw an ellipse within the cell using the specified bounds
    dc.Graphics.DrawEllipse(Pens.Blue, ellipseBounds);
  }
}
In this example:
RGDrawingContext dc: Provides the drawing context, including theGraphicsobject used for drawing shapes, text, and other graphics.base.Bounds: Represents the cell’s boundaries and is maintained automatically by ReoGrid. It is used here to define the size and position of the ellipse relative to the cell.
By overriding the OnPaint method, you can perform custom drawing operations for the cell, such as drawing shapes, text, or images, thereby enhancing the cell’s visual representation according to your specific requirements.
Drawing Default Cell Text and Background
To render the cell’s background and text according to ReoGrid’s default behavior, call the following methods within your custom cell body’s drawing logic:
dc.DrawCellBackground();   // To redraw the cell background
dc.DrawCellText();         // To redraw the cell text
These methods should be called from within the OnPaint method override in your custom CellBody class. dc refers to the CellDrawingContext object passed to the OnPaint method, which provides the drawing surface and context for cell rendering.
Example usage in a custom CellBody class:
public override void OnPaint(CellDrawingContext dc)
{
    // Draw the default cell background
    dc.DrawCellBackground();

    // Custom drawing logic here

    // Draw the default cell text on top of the background
    dc.DrawCellText();

    // Additional custom drawing logic can follow
}
A sample result:

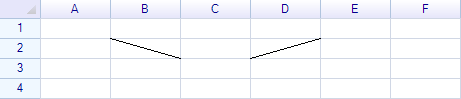
Example: Draw a diagonal line inside a cell
Below is an example that draws diagonal lines inside a cell. Create the custom cell body:
class DiagonalLineCell : CellBody
{
  public bool FromTopLeft { get; set; }

  public DiagonalLineCell() { this.FromTopLeft = true; }

  public override void OnPaint(unvell.ReoGrid.RGDrawingContext dc)
  {
   if (FromTopLeft) {
     dc.Graphics.DrawLine(Pens.Black, new Point(0, 0), new Point(Bounds.Right, Bounds.Bottom));
   } else {
     dc.Graphics.DrawLine(Pens.Black, new Point(0, Bounds.Bottom), new Point(Bounds.Right, 0));
   }
  }
}
Add two instances to the worksheet:
sheet["B2"] = new DiagonalLineCell();
sheet["D2"] = new DiagonalLineCell() { FromTopLeft = false };
The result:
Disable cell edit
Override the OnStartEdit method and return false to prevent the default edit operation.
private class MyCellBody : CellBody
{
  public override bool OnStartEdit()
  {
    return false;
  }
}
Change edit result
Override the OnEndEdit method and return data to replace the user’s edit result.
Handle mouse and keyboard events
Override methods such as OnKeyDown and OnMouseDown to handle keyboard and mouse events.
public override bool OnMouseDown(CellMouseEventArgs e)
{
  // translate cursor position to percent
  int value = (int)Math.Round(x * 100f / (Bounds.Width));

  // update cell's data, but do not set the data to cell directly, call methods of control instead
  sheet.SetCellData(e.CellPosition, value);
}
Data bind using formula
It is possible to bind two cells’ data using a formula:
sheet["C7"] = "=E7";
Built-in cell types
ReoGrid provides many built-in cell types such as Button, Check Box, Drop-down List, Image, and more. See Built-in Cell Types.