Most “generate a receipt / invoice / 帳票” tutorials spend 200 lines drawing boxes and positioning text with Graphics.DrawString. Then a customer asks to move the logo 5mm and you’re back in the code editor with a ruler.
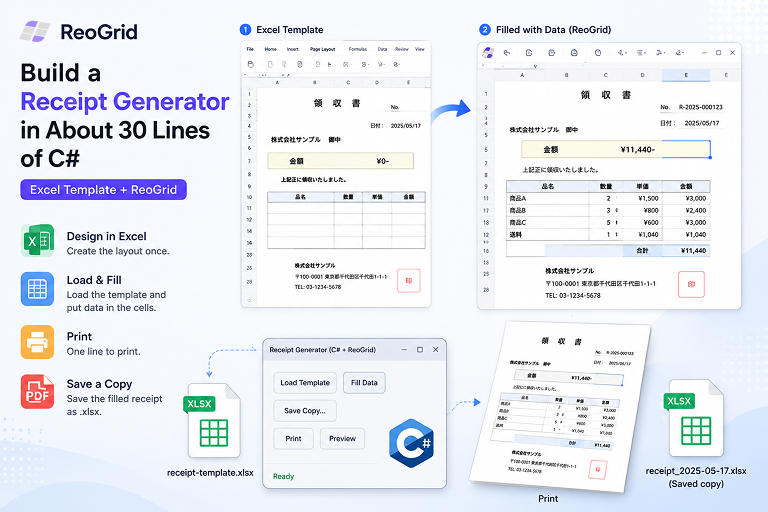
There’s a much shorter path. Design the layout once in Excel — logo, borders, fonts, labels, the lot — save it as an .xlsx template, then write a tiny program that loads the template, drops today’s values into the empty cells, and prints. The visual design never touches your code, so the code stays tiny.
Here’s the whole thing — a complete, runnable WinForms app — in about 30 lines.
The idea: the template does the design, the code fills the blanks
A receipt is 90% fixed layout and 10% variable data. The fixed part — your company name, the logo, the table grid, the “領収書” heading, the seal box — belongs in a designer, not in source code. Excel is that designer, and everyone on your team already knows how to use it.
So the split is:
receipt-template.xlsx— built in Excel. Merged title cell, a bordered line-item table, a total row, your logo as a floating image. The cells that change are simply left blank.- Your program — loads that file, writes values into the blank cells (
C3,B5, the item rows…), and calls print.
ReoGrid is what bridges the two: it reads the .xlsx natively (fonts, fills, borders, merged cells, images all intact), lets you address cells exactly like Excel (sheet["C3"]), recalculates formulas with its built-in engine, and prints — all in-process, with no Excel installed.
Step 1 — Design the template in Excel
Open Excel, build the receipt the way you want it printed, and leave the dynamic cells empty:
| Cell | Purpose | Filled by |
|---|---|---|
C2 | Receipt number | code |
C3 | Issue date | code |
B5 | Customer name (御中 / 様) | code |
B7 | Description (但し書き) | code |
B10:D12 | Line items (name, qty, unit price) | code |
E10:E12 | Amount per line | formula |
E13 | Total | formula |
| logo, title, borders, labels | — | template (fixed) |
Save it next to your executable as receipt-template.xlsx. That file carries all the styling; your code never sets a font or a border.
Step 2 — The whole app
Install the package:
PM> Install-Package unvell.ReoGrid.dllThen this is the entire program:
using System;
using System.Windows.Forms;
using unvell.ReoGrid;

class ReceiptApp : Form
{
    readonly ReoGridControl grid = new() { Dock = DockStyle.Fill };

    ReceiptApp()
    {
        var button = new Button { Text = "Issue & Print", Dock = DockStyle.Top, Height = 40 };
        button.Click += (s, e) => IssueReceipt();
        Controls.Add(grid);
        Controls.Add(button);
        grid.Load("receipt-template.xlsx");          // the layout you designed in Excel
        Text = "Receipt";
        Size = new System.Drawing.Size(720, 900);
    }

    void IssueReceipt()
    {
        var sheet = grid.CurrentWorksheet;

        sheet["C2"] = $"No. {DateTime.Now:yyyyMMdd}-001";
        sheet["C3"] = DateTime.Now.ToString("yyyy-MM-dd");
        sheet["B5"] = "Acme Corporation";
        sheet["B7"] = "For: website development";

        var items = new[]
        {
            ("Design",          1, 120000),
            ("Coding",          1,  80000),
            ("Maintenance/mo",  6,   5000),
        };

        int first = 10, r = first;                   // line items start at row 10
        foreach (var (name, qty, price) in items)
        {
            sheet[$"B{r}"] = name;
            sheet[$"C{r}"] = qty;
            sheet[$"D{r}"] = price;
            sheet[$"E{r}"] = $"=C{r}*D{r}";          // amount = qty × unit price
            r++;
        }
        sheet[$"E{r}"] = $"=SUM(E{first}:E{r - 1})"; // total

        grid.Save($"receipt-{DateTime.Now:yyyyMMdd-HHmmss}.xlsx");  // keep a copy
        sheet.CreatePrintSession().Print();          // send to the default printer
    }

    [STAThread]
    static void Main() => Application.Run(new ReceiptApp());
}
That’s it. Run it, click Issue & Print, and a fully formatted receipt comes out of the printer — with the totals calculated by the formula engine, and an .xlsx copy saved to disk for your records.
The part that actually issues the receipt — IssueReceipt() — is about 20 lines. Everything else is just a window with a button.
Why it’s so short
Three things are doing the heavy lifting so your code doesn’t have to:
- The Excel template carries every pixel of layout. No
DrawString, no manual column widths, no border code. Want to move the logo? Open the.xlsx, drag it, save. Zero code changes. - The formula engine computes line amounts and the total. You write
=C10*D10and=SUM(...)into cells exactly like Excel — ReoGrid recalculates them before printing. No tax/subtotal math in C#. CreatePrintSession().Print()turns the rendered worksheet into print output in one call. ReoGrid handles paging, scaling, and the printable range for you — see Printing a Spreadsheet in C# for the full set of options.
Addressing cells: two equivalent styles
The example uses string addresses because they read like the Excel template:
sheet["C3"] = DateTime.Now.ToString("yyyy-MM-dd");
sheet[$"E{r}"] = $"=C{r}*D{r}";
When you’re iterating rows, the zero-based [row, col] indexer is often cleaner:
sheet[9, 4] = "=C10*D10"; // row 9 (0-based) = Excel row 10, col 4 = column EBoth write to the same cells. Use whichever makes the row math clearer; string addresses tend to win when you’re matching a template you built by hand.
Common follow-up: preview before printing
Print() goes straight to the default printer. To show the user a preview first, hand the session’s PrintDocument to the standard dialog:
using var session = sheet.CreatePrintSession();
using var preview = new PrintPreviewDialog { Document = session.PrintDocument };
preview.ShowDialog(this);
Or pop a printer-picker with System.Windows.Forms.PrintDialog. Both are covered in the printing guide.
Common follow-up: save as PDF instead of paper
A receipt app usually needs to email the PDF, not print it. Point the print session at the built-in PDF printer:
sheet.PrintSettings.PrinterName = "Microsoft Print to PDF";
sheet.CreatePrintSession().Print();   // writes a .pdf instead of paper
No PDF library, no extra dependency — Windows’ own virtual printer does the rendering.
Common follow-up: a second copy, a different sheet
Real receipts often need an “office copy” and a “customer copy”, or a separate delivery note. Put each on its own worksheet in the template and print the ones you want:
var session = grid.CreatePrintSession();
session.Worksheets.Clear();
session.Worksheets.Add(grid.Worksheets["Receipt"]);
session.Worksheets.Add(grid.Worksheets["OfficeCopy"]);
session.Print();
The template stays the single source of truth for how each document looks.
When you’d reach for something heavier
This pattern is ideal for receipts, invoices, quotations, delivery notes, and most single-page 帳票 where the layout is stable and the data is tabular. If you need band-based reports that grow across many pages with grouping and sub-totals computed by the reporting tool, a dedicated report engine earns its keep. But for “fill in this form and print it,” a spreadsheet template plus 30 lines is hard to beat — and your non-developers can edit the layout without you.
Where to go next
- Printing a Spreadsheet in C# — preview, PDF, paper size, margins, and page breaks in depth
- Display and Edit an Excel File in a WinForms or WPF App — the loading/saving side in full
- ReoGrid installation guide — NuGet packages and references
- Formulas and the calculation engine — what you can put in a
=cell